A Journey Down Green Bean Casserole Memory Lane

February 25, 2009

Green Bean Casserole: Complete with Fried Onions

Green Bean Casserole: Complete with Fried Onions


I miss New York. A lot. As a resident of New York City, I became very defined by my surroundings. When I first moved to Manhattan in 2004, I lived on the fifth floor of an old walk-up tenement building that was built in the mid-1880s and once served as the home to dozens of immigrants from Ireland, Germany and Italy who worked in the canneries along the East river, served the wealthy who resided in the mansions along 5th Avenue and who tirelessly worked to build and develop the Manhattan we know today. Looking out the only window in my apartment that had a view, I saw the huge and beautiful stain glass window of St. Stevens Catholic Church, a church that was built on 28th street in 1853. While I am not a very religious person, I felt very blessed to live next to St. Stevens. Over the four years that I lived in this apartment, I never grew tired of looking at the Church and with my every glance at it, I felt more connected to my City and came to better appreciate and understand the history of the neighborhood and its former residents.

The views from my Pasadena apartment are very different from what I saw in New York. From my living room, I see the most perfectly shaped palm tree. I often wonder how old it is and how with the development of our condo complex it was never cut down. From my back patio, I see the San Gabriel mountains. While I love and appreciate the scenic views I now have, a palm tree and a mountain range cannot tell me about Pasadena’s history or some of its early settlers.

Recently, I have been thinking a lot about my new surroundings, looking at the views, and missing what I left behind. I know that my sense of place in Pasadena will come with time, but because I cannot take a quick jaunt back to New York for a visit, I have been doing a lot of comfort cooking – making those dishes that remind me of home.

Growing up, one of my all time favorite dishes was green bean casserole, a recipe that my father claimed came from his grandmother, Mom-Mom. Believing that it was a family recipe passed down through the generations, Mom-Mom’s Beans, for me, became such a novelty, even though my mother did not make them often. When they were served, I remember savoring each bite of french-cut green beans smothered in cream of mushroom soup, covered with crispy fried onions and fervently hoping that there was always more on the stove for seconds. Accompanied with a roast chicken, green bean casserole was my ultimate comfort food.

Up until this past weekend, I cannot remember the last time I had Mom-Mom’s green bean casserole, despite the memories of its taste, flavor and preparation seeming so fresh in my mind. I remember opening a can of Campbell’s Cream of Mushroom Soup and mixing it in to steaming green beans. I remember the popping sound that the lid of the French’s French Fried Onions made as it opened. And I remember trying to sneak some of the fried onion rings that were left in the can after the casserole was put in the oven to bake.

This past weekend, after really missing New York all week, I made Mom-Mom’s Beans. Believing that her beans would culinarily transport me back home, I carefully prepared them, baked them until the top layer was just slightly crispy and served them next to a delicious roast chicken. Within seconds, all the anticipation and expectation of Mom-Mom’s delicious beans were shattered. They were not at all as I remembered. They were bland, boring and completely uninteresting. I am not sure if my palate has evolved from when I was 12, but after a few bites, I understood why my mother rarely served Mom-Mom’s beans…

Although I tried (and perhaps desperately tried) to resurrect comforting memories from my past, eating Mom-Mom’s Beans reminded me that what we remember isn’t always as it seems. While I miss my old New York apartment on 3rd Avenue and its views of St. Stevens Church, I must remember that I cursed the 5 flights of stairs I had to climb to get to it on a daily basis. While I believe my recent nostalgia of New York has perhaps lead to my recent blogging hiatus, I am glad that my culinary journey down green bean casserole memory lane has taught me that my surroundings here are still new, and that my sense of place and comfort in Pasadena will eventually come – and may come with a view of a perfectly shaped palm tree.

Until next time…

Roasted Tomatoes: A Remedy for an Out-of-Season Craving

January 14, 2009

A Winterized Caprese Salad with Roasted Roma Tomatoes

A Winterized Caprese Salad with Roasted Roma Tomatoes


We always want what we can’t have. For some, that may mean wanting to drive a Ferrari, rather than a Honda, and for others, wanting the latest designer handbag rather than the knock-off sold on the street. Believe me, I have wasted my fair share of money on several pleather “Prato’s” from the corner of 17th and 5th, but notwithstanding, my wants and cravings are generally food related. I remember being quite young and sick with the flu and craving a huge chocolate milkshake, despite exhibiting all of the traditional flu-like symptoms. Today, while I may have learned to curb unrealistic cravings while sick, I find myself craving and wanting certain types of fruits and vegetables that are out of season – like a juicy heirloom tomato in January.

It has been unseasonably warm in Pasadena recently (unseasonably warm for me – perhaps 80 degree weather is normal in January, but I haven’t quite accepted that yet), and as a result of this weather, I have started craving summer produce and summer dishes. The other day I had a tremendous hankering for a Caprese salad. During the late summer months when tomatoes are peaking in their season, there are few things finer than a plate of big juicy tomatoes smothered with fresh basil and mozzarella. Mmmm….I can almost taste the acidity of the balsamic vinegar….. Unfortunately, and contrary to what the sunny and warm whether seems to be telling my palate, we are in January, not July, and those beautiful heirloom tomatoes are just not around.

Knowing full well that my desire for a traditional Caprese salad was next to impossible to have, I decided to make a winterized Caprese salad. Although grocery stores always carry tomatoes year-round, I rarely buy tomatoes in the winter because they are no where as flavorful as a tomato that is fresh, local and in season. The tomatoes at my grocery store this time of year – even in sunny California – are a few shades lighter than the deep red we see during the summer and early fall months, they are generally harder, and they always lack a lot of flavor. Why wouldn’t they – they have been sitting on a boat, a truck and a pallet in the back of your local grocery store for days.

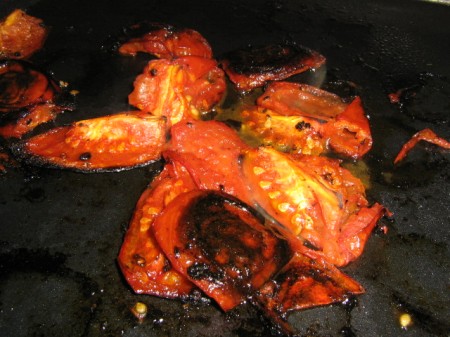
Despite a January tomato’s bleakness, I have discovered that they are not completely useless and flavorless, and actually, can be quite tasty and satisfying with the right preparation. Roasting tomatoes, for example, really brings out a winter tomato’s flavor and tenderizes the tomato while it is roasting. For my winter Caprese salad, I roasted Roma tomatoes coated in extra-virgin olive oil and seasoned with salt and pepper.

After a few attempts at roasting tomatoes, yes a few attempts, I had tomatoes that were full of flavor and very juicy. I will let the pictures below tell the story, but Roma tomatoes roast best in a 375 degree oven for about 30 minutes. After the tomatoes have finished roasting, let them cool completely before tossing them with mozzarella, basil and your favorite balsamic dressing. A winterized Caprese may not be an exact remedy for your out-of-season cravings, but roasting winter tomatoes is certainly one way of satisfying what we can’t always have…especially in January.

Until next time…

Tomatoes Roasted for 15 Minutes Too Long

Roasted Tomatoes Take 1: Tomatoes Roasted for 15 Minutes Too Long

Too High of Heat

Roasted Roma Tomatoes Take 2: Too High of Heat

Not Your Mother’s (or Grandmother’s) Meatballs

January 8, 2009
Spaghetti and Meatballs

Ultimate Comfort Food: Spaghetti and Meatballs

One of my favorite meals is spaghetti and meatballs. Spaghetti and meatballs, similar to a perfectly roasted chicken, is my ultimate comfort food. Interestingly, spaghetti and meatballs is not one of my favorite comfort foods because I grew up eating the dish, or because I have a special memory of a family member laboring over making meatballs. I have grown to love the meal on my own and find that I am quickly transported to a gastronomic euphoria by the smells of meatballs bubbling in homemade sauce on the stove.

I once said in a previous blog that a meatball is like a souffle: if it isn’t perfect, it just isn’t. With that, meatballs, for me, are little gastronomic gifts that can vary in significance based on the quality of the meatball. A store-bought meatball, or one that is made in haste with the minimum ingredients, is not very significant. It is like a $10 pedicure – a quick fix for the craving but doesn’t come with much pleasure. Conversely, a homemade meatball that is moist and has layered flavors from a trifecta of meats and fresh seasonings, one in which you can almost taste the labor that went into making it, is a very significant culinary gift. This latter meatball is a kin to the signature pedicure at a very nice day spa – completely satisfying and completely comforting.

A homemade meatball that is made exactly to my liking doesn’t come with ease or frequency. Actually, I tend to make them as often as I treat myself to a pedicure at a fancy day spa. But, after salivating over the cover of this month’s Gourmet magazine, the special Italian-American issue featuring a very appetizing bowl of spaghetti and meatballs, I was hungry for homemade, traditionally prepared, meatballs. Also, knowing that we had some house guests arriving after Christmas, spaghetti and meatballs seemed like the perfect meal for post-holiday gluttony. Here is a link to the recipe: http://www.epicurious.com/recipes/food/views/Spaghetti-and-Meatballs-351190

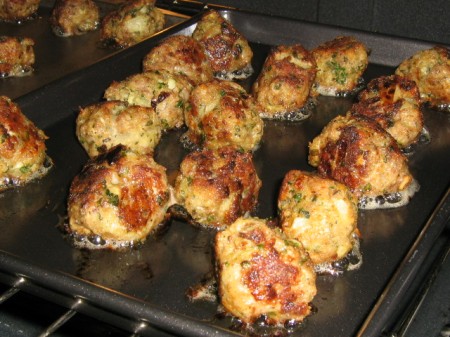
Using the recipe featured in Gourmet as a guide (I wanted to improvise a bit), I spent an entire morning making approximately 3 dozen meatballs – I wanted more than enough to freeze for later meals! The Gourmet recipe seemed rather traditional and called for using the three meats (veal, beef and pork), homemade breadcrumbs and lots of onions and fresh spices. I took the recipe’s advice and used a medley of meats; I agree that a blend of ground meat makes a much better meatball – they are more moist and flavorful than a straight beef meatball, for example. I did, however, cheat a bit and used store-bought breadcrumbs rather than making my own. I also cooked the meatballs a bit differently than the recipe advised. I browned the meatballs in a large skillet as directed, but rather than cooking the meatballs through in my sauce, I baked the meatballs until they were completely cooked. I found that this allowed the meatballs to maintain the delicious crispy texture they get when they are browned and also allowed me to easily freeze them completely cooked.

I’ll allow the pictures below to tell the step-by-step preparation story, but these meatballs were not your mother’s (or your grandmother’s) meatballs. There was something about the combination of ingredients – maybe the fresh oregano, or perhaps it was that I baked the meatballs; a technique that I believe may have locked in all of their freshness and created a sort of a molten chocolate cake effect – flavors gushing out with a slice of a fork – but whatever the reason, these meatballs seemed a bit new-age and hip, despite the traditional labor that went into making them. They were moist, earthy, light, and most importantly, completely satisfying and comforting…much like that signature pedicure at a nice day spa.

Until next time…

Sauteed Onions and Garlic with Fresh Parsley

Sauteed Onions and Garlic with Fresh Parsley

Uncooked Meatballs - Just Rolled and Ready to Cook!

Uncooked Meatballs - Just Rolled and Ready to Cook!

Browning the Meatballs in Olive Oil

Browning the Meatballs in Olive Oil

Baking the Meatballs - So Deliecious!!

Baking the Meatballs - So Deliecious!!

A Sauce-Smothered Meatball - Yum Yum Yummy!!

A Sauce-Smothered Meatball - Yum Yum Yummy!!

Season Eats: Beef Stroganoff

December 31, 2008

Rich and Delicious Beef Stoganoff

Rich and Delicious Beef Stoganoff


Happy Holidays! Perhaps this posting is coming a bit late – the days always seem to get a little crazy during the holidays. This year, George and I celebrated our first Christmas in California. It was an exciting Christmas for us – our first as a married couple, our first on our own without our immediate families and our first in moderate degree temperatures.

For me, Christmas, or better yet the whole winter season, is not so much defined by sharing it with family and close friends, but by the smells, sounds and cold temperatures that have come to shape my holiday season. There is a certain crispness to the ringing of a Salvation Army bell outside of Grand Central Station on a cold December day that is not heard when I enter my local Pasadena grocery store. The sound firewood makes when my Dad drops it on our back deck on Long Island in anticipation of building a fire cannot be replicated in our Pasadena condo. That sound, which resembles a drumroll on a tampered kettle drum is so perfectly pitched because of the dry salty cold air created by our proximity to Peconic Bay. The holiday season is also not complete without the aromas and smells of winter stews and soups bubbling on the stove in a warm kitchen.

While I may be thousands of miles away from a New York winter day, I am doing my best to bring my associations of the season to Pasadena. Recently, I made a big pot of Beef Stroganoff and let its rich sauce simmer on the stove to allow the fragrances of the beef broth and fresh oregano permeate the kitchen and apartment. Two of my favorite winter meals are Beef Stroganoff and Beef Bourguignon. I have a great Beef Bourguignon recipe and over the years have figured out how to turn Beef Bourguignon into Beef Bouguign-Yum. Unfortunately, I cannot say the same about Beef Stronganoff and every time I make it, I blend together several different Stroganoff recipes creating my own version – the version I remember eating on cold winter nights back East.

Unlike other stews that taste better when cooked slowly, Beef Stroganoff can be made in about 45 minutes. Beef Stroganoff is also different from other winter stews as its ingredients are not cooked simultaneously in one pot; the dish requires that individual attention be paid to several of its ingredients. I have seen ingredients and spices vary by recipe, but my favorite Beef Stroganoff is quite basic – it is simply sliced sirloin, mushrooms, onions and the sauce, which is a beef broth and wine reduction seasoned with fresh oregano, tomato paste and salt and pepper. Of course, any Beef Stroganoff would not be complete without its piece de resistance – a little sour cream added at the end. The sour cream adds a nice blushness to the sauce making it warm and rich for any winter night dinner.

I have included my recipe, which as previously mentioned, is a blend of several recipes.

Beef Stoganoff
Serves 6

1 tablespoon olive oil
2 tablespoons butter
1 1/2 pounds sirloin, sliced
1 large onion sliced or 2 small onions sliced
1 cup mushrooms, sliced
1 1/2 cups beef broth
1/2 cup dry white wine
2 tablespoons flour
2 tablespoons tomato paste
2 tablespoons fresh oregano or 1 teaspoon of dried oregano
salt and pepper
2 tablespoons chopped parsley
1/4 cup of sour cream

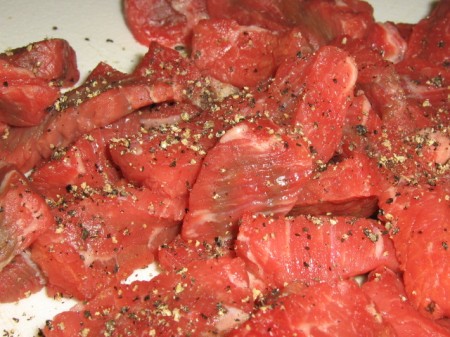
Began by slicing the sirloin into 1/3 inch strips about 2 inches long and seasoning the meat with salt and pepper. Set the seasoned meat aside.

Seasoned Sirloin - Set Aside and Waiting to be Browned

Seasoned Sirloin - Set Aside and Waiting to be Browned


In a large skillet or small dutch oven, heat 1 tablespoon of butter. Add onions and saute until tender and translucent. Remove onions and set aside.
Sauteeing the Onions

Sauteeing the Onions


In the same pot, add remaining butter and mushrooms and saute until tender. Remove mushrooms and set aside. Add olive oil to the skillet and add meat. Brown the meat on all sides – about 3 minutes per side.
Browning the Sirloin

Browning the Sirloin


Add the mushrooms and onions and stir together. When the meat has browned, sprinkle in flour and stir. Add beef broth and wine and blend together. Stir in tomato paste, oregano and season with salt and pepper. Let simmer for 20 minutes until liquid as reduced and thickened. A few minutes before serving, add sour cream and parsley and blend together.
Blending the Sour Cream and Parsley

Blending the Sour Cream and Parsley

I serve Beef Stroganoff over egg noodles, but the dish could easily be served over rice or steamed greens.

While our Pasadena nights are not as cold as a winter night in New York, this Beef Stroganoff dish certainly makes the holiday season smell and taste just the way I like it!

Until next time…

Risotto: A Labor of Culinary Love

December 18, 2008

Risotto with Shallots, Basil and Pecorino Romano

Risotto with Shallots, Basil and Pecorino Romano


Risotto is one of my favorite dishes and I clearly remember my first risotto experience. I was 22 years old, a first-year in law school and dining at Elda’s on Lark, a sort-of-swanky restaurant in the more hipster and trendy section of Albany, New York. I don’t exactly recall my risotto dish at Elda’s – I believe it was made with mushrooms and asparagus, but two memories resonate from that night at Elda’s. I remember fretting over whether I had enough money in my checking account to pay for the meal with my debit card rather than my credit card, and second – and much more important than money – I remember thinking, for the very first time, that I could not only replicate the risotto dish at home, but that I could probably make it better.

I have always been interested in cooking and in food, but it wasn’t until my early twenties and really living on my own that I started to appreciate and experiment with food. After my dining experience at Elda’s, I taught myself how to make risotto and found that learning the proper technique is a lot like riding a horse. You may fall off every now and again, but if you don’t get back in the saddle and try again, you’ll never learn.

Risotto is a labor of culinary love and is not your ordinary rice dish. Risotto has a creamy and rich texture, and when prepared successfully each individual rice grain should have the slightest bite to it. Cooking risotto requires an adherence to an established method of preparation in which flavors are built on top of each other resulting in a rice that is creamy – not because cream is used as an ingredient, but because the broth is added to the rice in a way that gives the starch in the rice a creamy texture.

There are so many ways to prepare risotto – it is much like a pasta sauce as almost anything can be added to it to build flavor. My favorite recipe is one that is very simple and uses shallots, fresh basil and Pecorino Romano cheese. Here is my recipe and preparation narrative.

Risotto with Shallots, Basil and Pecorino Romano
Serves 4

1 cup of Arborio rice
2 1/4 cups of chicken broth, heated
1/3 cup of dry white wine
1 medium shallot, diced
2 tablespoon of butter
2 tablespoons of olive oil
1/3 cup chopped fresh basil
1/4 cup of Pecorino Romano cheese
salt and pepper

In a small saucepan heat chicken broth until simmering, reduce heat and continue to simmer.
In a medium saucepan, begin by heating the olive oil and butter. When heated, add the shallots, season with salt and pepper, and cook until tender and translucent. Add the rice and saute for approximately 2 minutes until the rice is coated by the oil and butter and begins to brown slightly. Add the wine and cook until the wine is absorbed into the rice. Begin adding the heated chicken broth, about 1/3 of a cup at a time, each time letting the rice absorb the broth.
The risotto will be done when there is a slight bite to each grain, but otherwise tender and cooked through.
When the rice is done, remove from heat and blend in basil and Pecorino Romano cheese.

I like to add the basil at the end so that it’s flavor and freshness is preserved. I also find that adding the basil last adds a layer of texture to the risotto that is in slight contrast with its creaminess, which for me, seems to make this simple recipe a bit more complex. This recipe can also be made with red wine (which was used in the risotto featured in the included pictures) – a nice alternative during the colder months as red wine tends to add a warmer and richer flavor than a white wine. But whether you use white or red wine, or whichever ingredients you choose to build your risotto’s flavor, be prepared to fall off the horse a few times. Getting back in the saddle and trying again will be rewarding. Risotto is pure pleasure on a plate and with practice, its preparation becomes a true labor of culinary love.

Until next time….

Saute Shallots in Butter and Oil

Step 1: Saute Shallots in Butter and Oil


Add Rice and Brown Slightly

Step 2: Add Rice and Brown Slightly


Add Wine and Allow Rice to Absorb Wine

Step 3: Add Wine and Allow Rice to Absorb Wine


Add Basil and Cheese (cheese not pictured)

Step 4: Add Basil and Cheese (cheese not pictured)

Chicken Dilemma: A Recipe Remedy

December 16, 2008

Sauteed Chicken in a Mushroom, Shallot and Dijon Sauce

Sauteed Chicken in a Mushroom, Shallot and Dijon Sauce


Are you tired of chicken, or at least tired of coming up with an interesting way to prepare chicken? If your answer is yes, you are not alone. I too suffer from Chicken Dilemma – a self-fabricated culinary illness that is, generally speaking, the result of a profound boredom from cooking chicken. Chicken, unlike other types of protein-powered poultries and meats, is relatively inexpensive and extremely versatile for week-night cooking. There are an infinite number of ways to prepare chicken as a main dish, from your basic baked, barbecued or fried, to the multiple ways of using it as an ingredient, such as in pasta sauces or salads. Different ethnic cuisines also offer a multitude of ways to prepare chicken, but despite the diverse spectrum of possibilities, doesn’t it seems difficult to find that magic go-to chicken recipe for a quick and easy meal?

For those of you who also suffer from Chicken Dilemma, I would like to share my go-to chicken recipe. This dish takes about 25 minutes from prep to plate and, for me, has served as a recipe template for culinary offshoots that mitigate chances of perpetual Chicken Dilemma.

Sauteed Chicken Breasts with Mushroom, Shallot, Dijon Sauce
Serves 4

4 thinly sliced chicken breasts
1 medium sized shallot, diced
1/3 cup button mushrooms, sliced
1 tablespoon Dijon mustard
1/2 cup chicken stock
2 tablespoons lemon juice
1 tablespoon butter
2 tablespoons olive oil
salt and pepper

Wash and Dry Chicken. Season with S & P

Step 1: Wash and Dry Chicken. Season with S & P

Wash and pat dry the chicken, season with salt and pepper. In a large skillet, heat the olive oil. When the oil is hot, add chicken, searing on medium to high heat each side until golden brown, approximately 3 to 4 minutes a side.
Browning the Chicken

Browning the Chicken


When the chicken has browned, remove. In the same skillet, add butter, shallots, mushrooms and Dijon mustard sauteing until shallots and mushrooms are soft. Deglaze the pan by adding the chicken broth and lemon juice and stir to loosen the browned bits of chicken left on the bottom of the pan. Add chicken and let it simmer for 3 minutes.
Making the Sauce - Mushrooms, Shallots, Dijon Mustard & Butter

Making the Sauce - Mushrooms, Shallots, Dijon Mustard & Butter


Chicken and Sauce Cooking Together

Chicken and Sauce Cooking Together


I served the chicken and its sauce over egg noodles, but it could easily be served over a rice pilaf, risotto, mashed potato or steamed greens. As noted above, this provides a good framework for other easy chicken dishes. For example, adding capers to the sauce quickly transforms the dish into Chicken Piccatta, another perfect remedy for a case of Chicken Dilemma.

Until next time…

One Potato, Two Potato, Three Potato, Blue Potato?

December 12, 2008

One Potato, Two Potato, Three Potatoe, Blue Potato!

One Potato, Two Potato, Three Potatoe, Blue Potato!


It is so easy to get stuck in a food rut, especially when it comes to cooking weeknight meals. We all have our old recipe standbys that we seem to cook over and over again; sort of like a CD that is stuck on repeat in a stereo. Week in and week out, that one chicken dish or that one pasta sauce recipe is resurrected and another same-old meal is had.
The Flesh of a Blue Potato

The Flesh of a Blue Potato


I was having one of those stuck-in-a-food-rut episodes recently and on a recent stroll through the produce department of my local market I discovered blue potatoes. A potatoes potential, culinarily speaking, is limitless. From mashed potatoes to baked potatoes, to roasted potatoes to gnocci, potatoes are culinary building blocks. But despite this, I have always treated potatoes rather simply, sticking to mashed or roasted potatoes. Boring? Maybe. But for quick and easy cooking, discovering blue potatoes certainly made my go-to recipes a little more interesting!

There are so many different varieties of potatoes, from the well-known Russet potato, to the various whites, yellows, reds and purple potatoes. Blue potatoes are fun little heirloom potatoes that have a deep blue skin and a vibrant purple flesh. For those of us who eat with our eyes, their color may actually fool you. A blue potato does not have, to my novice palate, a flavor that is all that different from a Yukon Gold, for example. While there is a bit of a distinguishing sweetness in a blue potato, they offer more of a sex appeal for your plate rather then your mouth, which is exactly what we need sometimes to pull us out of a cooking rut.

Blue potatoes can easily turn your everyday mashed potatoes into something new and different. Rather than mashing Russet potatoes recently, a side dish that I have made for years, I mashed garlic infused blue potatoes and found them to be gastronomically cathartic. It was an easy switch that made a familiar side exciting and inspiring. Blue potatoes also roast very well. Roasting blue potatoes with a little olive oil and coarse sea salt is very satisfying and once again, makes a go-to side dish seem like a new culinary experience.

Roasted Blue Potatoes and Carrots

Roasted Blue Potatoes and Carrots


Discovering blue potatoes was exactly what I needed to pull myself out of my cooking rut. I realized that I don’t have to reinvent my weekday menu to overcome a cooking malaise, but simply using a different variety of a vegetable, or in my case a potato, can make all the difference.

Until next time…

Persimmons: Not to be Confused with Small Pumpkins

December 10, 2008

The Beautiful and Wonderful Persimmon!

The Beautiful and Wonderful Persimmon!


Meet Persimmon. Pronounced, per-SIM-un, not, per-sinn-amon, like cinnamon. Seriously, what a culinary faux-pas on my part, but I blame geography. I just could not buy fresh persimmons when living in New York City and therefore, I have never had to try to pronounce the fruit’s name. Outside of perhaps the Upper West Side’s food Mecca, Fairway (on a rare day), and some of NYC’s finest restaurants, I have never seen, and obviously have never eaten, a persimmon. And yes, I now regret the last 30 years…persimmons are a mouthful of magic!

A Hachiya Persimmon

A Hachiya Persimmon

My first close encounters with a persimmon occurred at the South Pasadena Farmers’ market this October. It was only after complimenting the farmer on his cute little pumpkins did I learn that persimmons are in no way related to squash, but they are their own fruit with many different varieties. Persimmons are in season in the Fall and we generally see the two most common persimmon varieties: the Hachiya, which is recognizable by its acorn shape; and, Fuyu, which looks like a squat tomato or small pumpkin. I have yet to eat the Hachiya variety of persimmon, but I had my first Fuyu persimmon and at first bite, I was in love.

)

A Fuyu Persimmon - similar to a small pumpkin, right?...:)

The Fuyu persimmons can be a little tricky for naive fruitarians. With many types of fruit, like pears or peaches, we know when they are ripe because there is a softness to them. Fuyu persimmons, conversely, are ripe when they are firm and can be eaten as is – much like an apple. This really through me for a bit of a loop. Before I first tasted a Fuyu persimmon, my instinct told me that its firmness would make it as unedible as an unripe nectarine, for example. Surprisingly, while there is a definite initial bite to a ripe Fuyu persimmon, there is an immediate tenderness in the fruit’s flesh that does not necessarily have a solitary taste. Sounding sort of like a sommelier, a Fuyu persimmon has a nuttiness to it which is offset by soft hints of honey and apricot. Its just delicious!

Coming from the East coast where apples dominate our farmstands in the Fall, I had no idea that persimmons were so versatile and offered such a diverse culinary palette. A little recipe research shows that persimmons pair well with almonds and walnuts and would make a great salad when tossed with greens. The pulp of persimmons can also be used in baking, much like pumpkin puree is used when making pumpkin bread or cookies. I am anxious to try baking Christmas persimmon cookies – an interesting concept for a California cook as it gives your holiday cookie a very seasonal meaning…

So while I may have spent years thinking that a persimmon was pronounced differently and shared the same genus as a pumpkin, I look forward to exploring its flavors. Hopefully I’ll have a good persimmon recipe to share soon!

Until next time…

Overcoming Baking Fears, One Cake at a Time

December 4, 2008

German Chocolate Cake

German Chocolate Cake

In my last posting I claimed that rocket scientists and mathematicians would make good bakers as baking is a very exact science. I still believe this, but I am now willing to acknowledge that anyone can bake, so long as a strict adherence is paid to the recipe. And herein lies my problem…. I do not follow directions well. I still remember, with perfect clarity, an incident when I was in the first grade when Mrs. Peters disciplined me for not following directions on an art project. Rather than precisely coloring within the outlined picture as instructed, I haphazardly colored in the picture as I wanted to be the student who finished the project first. Unfortunately, I never learned the lesson in first grade, and this scenario, with different facts, has been played on repeat throughout my life.

Perhaps the humiliation, yes humiliation, I faced in Mrs. Peter’s class has transcended my life and I have since shied away from projects requiring an attention to detail…like baking. Fortunately, 25 years later, I am now taking on baking-related fears and learning, that with discipline, baking a German Chocolate cake is well within my reach.

On Monday, I made a German Chocolate Cake for George’s birthday, and I have to say, it was the best cake I have ever had. Seriously. Using my kitchen bible as my guide, The Fannie Farmer Cookbook, I methodically worked through the cake’s recipe and made a cake from scratch. With all the cooking I have done over the years, I have never made a proper cake – one that is layered with home-made frosting – from scratch. And for George’s birthday, I wasn’t going to sell myself short with a boxed cake…even though the temptation was great. Having a lot of trust in Marion Cunningham and her epic cookbook, I got baking.

Diligently following the recipe, I completed the first several steps with ease. I successfully preheated the oven to 350 degrees, I greased my cake pans and even cut out perfectly symmetrical circles of wax paper to line the bottom of my greased cake pans. I was on a baking roll! As my confidence started to build, I carefully melted 4 ounces of Baker’s German sweet chocolate and let it cool, I creamed the butter and sugar until fluffy and even added the egg yolks to the butter and sugar mixture one at a time without incident. Well, I had one egg casualty, but it did not compromise my cake…just our floor. Reading and re-reading the recipe verbatim, I blended the vanilla and melted chocolate and began to slowly add the dry ingredients. It was at this point that I began feeling really good about my skills and suffered a baking relapse. I stopped reading each word of the recipe. And oh yes, words matter.

I finished mixing in all of my dry ingredients and my batter was smooth. The only remaining step was to fold in the egg whites and without thinking too much into it, I dumped my bowl of egg whites into the batter and watched them spread across the batter like balsamic vinegar touching olive oil, a reaction I was not expecting. After a wave of emotion passed that started with confusion and ended with utter rage, I reread the recipe. “Fold in beaten egg whites.” Hmph. I read, ‘fold in egg whites’, not, fold in beaten egg whites.

Folding in beaten egg whites is critical for German Chocolate cake. A German Chocolate Cake, while decadent and rich, is supposed to be fluffy and light. Beating an egg white allows the protein in the egg white to expand, which in turn will give a cake more volume…hence the fluffy and light characteristic of German Chocolate Cake. Since I did not beat my egg whites, as the recipe instructed, and not wanting to start over, I decided to beat the whole batter, with the incorporated egg whites, for about a minute on the highest setting of my Kitchen Aid thinking that maybe the eggs’ protein would expand. While it seemed at times that my Kitchen Aid was about to launch itself off the counter because it was going so fast, the method really worked. I frosted the cake with the traditional coconut and pecan icing and enjoyed a very fluffy, very light and very tasty German Chocolate Cake.

The fluffy German Chocolate Cake!

The fluffy German Chocolate Cake!

So while my lack of attention to recipe details did not ruin the cake this time, I did learn an important baking lesson. A methodical baker is a successful baker.

Until next time….

Marion Cunningham’s German Chocolate Cake
4 ounces of Baker’s German’s Sweet Chocolate
1/2 cup boiling water
1 cup of butter
2 cups of sugar
4 eggs, separated
1 teaspoon vanilla
2 1/2 cups all-purpose flour
1 teaspoon baking soda
1/2 teaspoon salt
1 cup buttermilk

Preheat oven to 350 degrees. Butter and flour three 9-inch round cake pans. Line the bottom of the pans with buttered wax paper. Melt chocolate in boiling water. Cool. In a mixing bowl, cream butter and sugar until fluffy. Add yolks, 1 at a time, beating well after each addition. Blend in vanilla and chocolate. Mix the flour with the soda and salt, then add alternatively with buttermilk to chocolate mixture, beating after each addition until smooth. Fold in beaten egg whites. Pour into the three prepared pans. Bake for 30-35 minutes. Cool in the pans for 5 minutes before turning out one to a rack to cool. Frost only the tops with frosting.

Marion Cunningham’s Coconut-Pecan Frosting
1 cup evaporated milk
1 cup sugar
2 eggs, slightly beaten
1/2 cup butter
1 teaspoon vanilla
1 1/3 cups Baker’s Angel Flake Coconut
1 cup chopped pecans

In a saucepan, mix the evaporated milk, sugar, egg yolks, butter and vanilla. Cook and stir over medium heat until thickened, about 12 minutes. Stir in the coconut and pecans. Cool until thick enough to spread, beating occasionally. You will have enough to fill and frost a 9-inch three layered cake.

Gobbling Up Some Tasty Turkey Cookies

December 2, 2008

While Thanksgiving may be behind us, the memories of my turkey cookies are still fresh in my mind. I made some decorative turkey cookies for Thanksgiving this year, and for my first go-around on creating and decorating edible turkeys, I did a decent job. Baking and decorating cookies is without a doubt an art form and truly requires a special talent, which I think I have in me, but with [a lot of] practice, I can become a better dough roller, frosting applier and icing piper.

Baking, unlike cooking, is very methodical. A baking soda miscalculation, or a slight flour overdose can really wreak havoc on your recipe. At least with cooking, we can taste our dish along the way and make changes to the recipe as needed. With baking, it is a sort of win-win or a complete loose-loose situation, and since I am not all that methodical and exact, I have treaded lightly when it has come to baking. Trying to overcome misconceptions that I have that bakers would also make good rocket scientists and mathematicians, I spent approximately 8 hours working on my turkey cookies. Fortunately, the time paid off!

I began by making a basic sugar cookie dough and refrigerating the dough to let it set. Once the dough was cooled, I rolled it out on wax paper until the dough was about an 1/8 of an inch thick. I then stamped the dough with my turkey-shaped cookie cutter and placed the cut out dough on an ungreased baking sheet. The cookies baked for about 10 minutes on a 350 degree oven.

Turkey Shaped Cookie Dough

Turkey Shaped Cookie Dough

Baked Turkey Cookies

Baked Turkey Cookies

After the cookies were baked, I let them cool for about an hour on a cooling rack. While the cookies were cooling, I made a royal icing using meringue powder, rather than egg whites, which are traditionally used in royal icing recipes. Meringue powder is a substitute for egg whites and I find it to be a bit more user-friendly than egg whites. Meringue powder is, however, a bit tricky to find, and I have yet to see it for sale outside of specialty or baking supply stores. I bought mine at Sur la Table in Pasadena, but if anyone can recommend a good baking supply store in the Pasadena area…..

Once my royal icing was made, I separated it into two bowls. In one bowl, I left the royal icing white, as-is, and used it for piping the white borders on my turkey cookies. In the second bowl, I added orange food coloring, which I used for the icing on my turkeys. I need a bit of practice using food coloring and I don’t think I added enough orange dye. My cookies, when dry, had a pinkish hue to them, rather than the autumn-orange color I wanted. Once my cookies were dry, I began applying the orange icing to them. Following the advice of one recipe I found, I tried dipping my first cookie face side down into the icing hoping to get an even application of the icing on the cookie. This did not work as the recipe indicated and I was left with icing blobs on the cookie. Perhaps my icing was too thick, but I found that using a small paintbrush and hand painting the icing on the cookies worked the best. This method was ridiculously time consuming, but until I figure out a more efficient method, I think I’ll stick to using the paintbrush.

Painting Royal Icing on the Cookies

Painting Royal Icing on the Cookies

After applying the orange icing to each cookie, I let the cookies dry for another hour or so. Once dry, I piped the white royal icing around the edges of each cookie, as well as giving each turkey an eye and a little feather detail. Piping, which is about as methodical as baking a wedding cake, was a bit overwhelming for me. Although I only put a little icing in my piping bag, I could not keep the icing from spewing out over the top of the bag like a geyser and it seemed like every line I made on the cookies came out in different widths and lengths. Fortunately, enough cookies were aesthetically presentable, and the rest of the turkey cookies were left for George to gobble up!

Turkey Cookies!

Turkey Cookies!


Decorating the turkey cookies, while challenging, was so much fun. My plan is to get a head-start on my Christmas cookies, hopefully improving on my dough-rolling and icing-piping techniques!

Until next time…

Sugar Cookies
1 cup of butter
1/2 cup granulated sugar
1 1/2 tsp vanilla
1 egg
2 1/2 cups of all-purpose flour
Cream the butter, sugar, and vanilla together. Blend in the egg and mix until blended. Add the flour slowly, mixing until combined. Refrigerate the dough, preferably over night, or until cooled and set.

Meringue Powder Royal Icing
1/4 cup of meringue powder
1/2 cup of iced water
1 pound powdered sugar
Mix Meringue powder and iced water until soft peaks form. Add sugar slowly, mixing it until combined. Add food coloring as desired.